THIS REVIEW WAS UPDATED ON May. 25th 2010Updates are in
Green Oct. 8th 2009,
Blue Nov. 9th 2009,
OD Jan. 1st 2010 &
Orange May 25th 2010Video instruction manual YouTube link has been added to bottom of this reviewTRIGGER HAPPY M240 REVIEW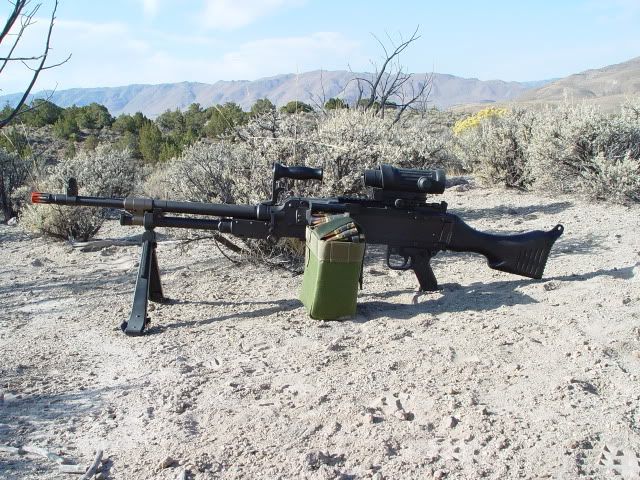
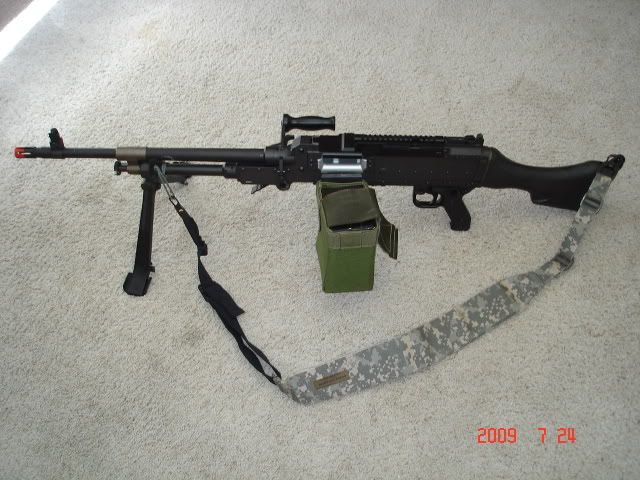
P.1 M240 is accessorized with a Trigger Happy Elcan scope and 7.62 dummy rounds
I’ve owned my Trigger Happy M240 now for almost a year. I ran into a few problems and tried to search the Internet for more information. However, I discovered there is not a whole lot out there. So I decided to write this review to help provide more hands on experience with this gun.
I purchased my TH M240 from Impact Games in Hawaii where the gun came directly from one of their suppliers in Hong Kong. Even though I’m in California, I chose Impact Games because they are one of the oldest airsoft shops in the U.S. and have one of the most experience airsoftsmiths I know. And since I was going to buy one of the most expensive airsoft guns currently available, I wanted it to be a solid reliable performer above all else.
P.2
I did some extensive research on the TH M240 before buying my gun. I’ve heard mixed reviews. The most common comments I heard was that on the out side, the gun was beautiful and well built but the internals and its shooting performance were somewhat below par (mainly the barrel) considering its price tag. I had also considered the Inokatsu M240 but after seeing a video review of it shooting with an accuracy of a shotgun at only 30 ft, not to mention its higher price, I dismissed it. I think we can all agree that if you spend more than a $1,000 on an airsoft gun, its performance should at least be better than your average AEG.
With that in mind I asked Impact Games to strip the internals and replace it with the best parts in the market.
The parts that were replaced are as follows.
PDI 05 (6.05mm inner barrel) 595mm barrel
Guarder Hop Bucking
Systema Ver.3 Taper Cylinder Head
PDI Palsonite Cylinder
Guarder SP120 Spring
Guarder Ver.2 Steel Spring Guide with Bearings
Systema Torque-Up Gears
Tokyo Marui EG1000 Motor
Note: I replaced the Guarder SP 120 spring with a Systema M120. My original request was to have the gun shoot 395~400 fps with Excel bio-bb but it was frequently shooting slightly over 400 fps which was disqualifying my gun sometimes. With the Systema M-120 it now shoots an average 395 fps which is perfect.
Note: This gun was chronoed using Excel 0.20g Bio-BBs. The Bio-BBs are slightly smaller than the average BB. Because of this they tend to shoot about 15 fps lower in long barrel guns.Note: It is not necessary to replace all the internal as I did. The biggest complaint I heard about this gun was the poor quality of the inner barrel. At minimum I would replace the inner barrel with a PDI or Prometheus inner barrel and the hop-up bucking with a Guarder hop-up bucking.Another thing that I asked them to upgrade was the ammo feeder pouch. The ammo feeder that sits in the ammo pouch is made out of cardboard. I understand they did this to be more realistic. A 100 rounds belt of 7.62mm bullets sometimes comes in a cardboard box. So they were trying to achieve this look.
P.3 This M-60 repack Kit is available at
http://www.cheaperthandirt.comBut in real life the box is used once then discarded. Cardboard wasn’t design for repeated use. So I had them replace the cardboard with plastic and duct tape to make it more durable. The results were quite nice, sturdy but flexible and with a pull up tab to boot.

P.4
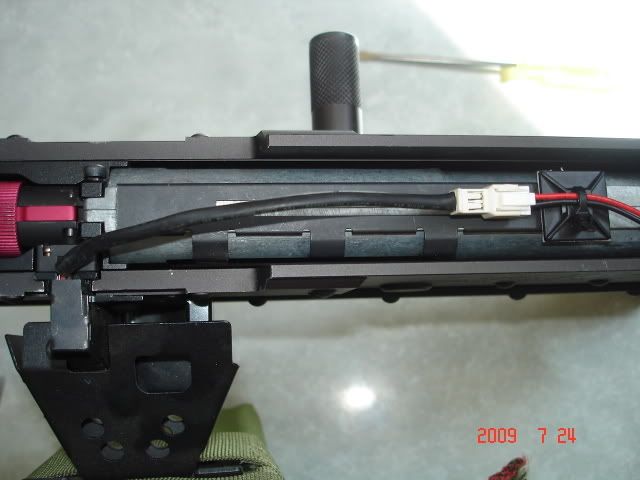
NOTE: On the very bottom of the feeder you will always see a white BB. This is an important anti-jamming feature and not a stuck BB. Don't try to remove it.At the time I made this review I did not have pictures of my gear box. I hope to have them posted in the near future. However, after doing some research on the Internet, I found a YouTube link for upgrading a VFC (Vega Force Company) M-60 Mk-43 gun. The gear box in this video looks nearly identical to the one in the Trigger Happy M-240. The only difference was the color of the gear box (mine was silver) and the trigger switch, which sits below and behind the motor and not under the cylinder as shown in the video. http://video.google.com/videoplay?docid=-6981761473105456457#When I got the gun and opened it up. Visually I was not disappointed. It looked very realistic and the parts looked like they were made with high quality machined parts and a nice gun metal finish.
The gun comes in 10 parts: barrel, bipod, receiver, ammo tray, top cover tray, ammo tray pin, trigger, trigger pin, stock and the ammo feeder pouch. Which assemble very much like a real M240. When I put all the parts together, the precision machining showed. All of the parts fit smoothly and snug like a pair of racing gloves.
However, there are 2 areas that require a little effort attaching.
One is the top tray. The front section of the top tray pushes up against a large spring button which is rather stiff making insertion of the tray pin a little difficult.
P.5
I found the best way to do this is to first drop in the silver ammo tray. Then insert the top tray at a 30' angle and firmly push the tray all the way forward, then close it. Once the top tray is closed, insert the pin that holds the ammo and top tray in.
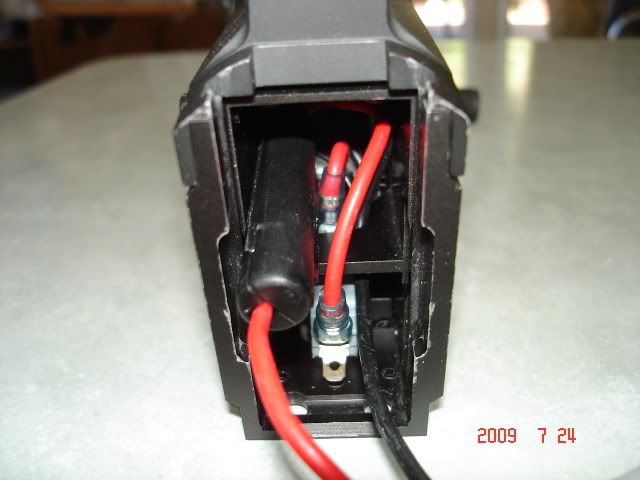
The other is the stock. The wires in the back can sometimes stick out a little making it difficult to close at times. The best thing to do is make sure the wire and fuse box are tucked well into the body before sliding the stock close.
P.6
There were two other areas that required some modification.
The first one was the stock. A large 9.6v battery fits snugly in the stock. However, with SAWs, I like to use a lower voltage battery such as an 8.4 v because I prefer to shoot with long but slow firing burst than a high speed short burst. (A SAW is all about suppression!) So, when I tried to put an 8.4v battery in, I discovered it wouldn’t drop in. Since the last battery cell on an 8.4v is perpendicular to the other cells it actually makes the battery a little wider on that end. Not a whole lot but enough that it wouldn’t drop in. If I pushed hard a little bit I could get it in but trying to get it out was twice as hard. I was concerned about ripping the wires out of the battery. I guess trigger Happy just automatically thought that everyone would use a large 9.6v and didn’t bother trying other batteries. So, I took a half rounded file and grinded the top and bottom of the inside of the stock neck. Fortunately I didn’t have to shave too much to get the 8.4 v to fit.
The other area that required minor modification and the only thing I considered to be a design flaw, was with the top tray cover. When I closed it, the top tray did not seem to be locking in. I could open it relatively easy by pulling on it without pushing in on the release buttons on the back of the tray . This was not right. Once the tray is locked in, it should sit securely on top of the receiver and not be easily pulled off. After a little examination, I discovered that the two little push buttons that you squeeze on the back of the top tray to open it are connected to 2 angle hooks underneath.
P.7
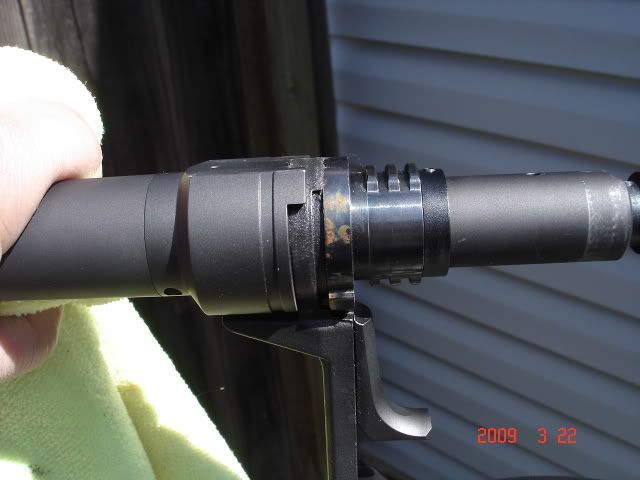
Theses angle hook are supposed to slip into a cut groove on the inside of the receiver and lock the tray down. (The groove is just above the red wire on the right).
P.8
The problem was the tray wasn’t sitting down low enough for the angle hooks to slip in to the locking grooves on the inside of the receiver. My first thought was to file the 2 nubs on top of the back section of the receiver where the tray sat on. But the tray was already sitting flush with the body. If I filed the 2 nubs, it would no longer sit flush with the body. Instead, I removed the rear locking angle irons (as shown in pic. 7) and filed the top portion down about 1 or 2mm. After I did this, it fixed the problem and now I can lift the gun up by the tray. However, I don’t recommend picking up your gun that way. Always use the handle.
As for performance, the THM240 shoots like a dream! Impact Game’s quality craftsmanship in upgrading this gun definitely shows. The range and accuracy is incredible. I basically can out gun just about anyone in the field. I have no trouble picking off targets at 50 yards. On top of that, the gearbox runs very smooth and quiet. That is a testament to an excellent shim job.
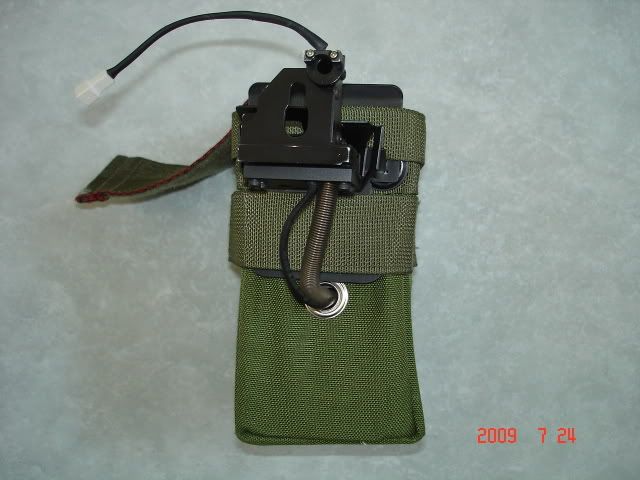
However the nicest aspect is the ammo box. It is one of the smoothest and quietest motorized ammo box/drum mags I have ever seen. In fact the first time I shot it. It was so quiet that I thought it wasn’t working. The other thing I like about it is that that there is only one small wire that you can barely see. This wire connects to another wire that shares the same connection as the trigger which connects to the battery in the stock. So there is no need to have a battery in the ammo box to power the feeder. And since they are connected together, the ammo box feeds BBs into the gun when ever you pull the trigger. Another excellent feature is the tube spring that feeds BBs from the ammo box to the gun is integrated into metal frame that clips on the side of the gun.
P.9
So attaching it is simple, easy and snug.
P.10
This is perhaps the most user friendly ammo box that I have ever seen. On top of all of this I never had a jam or feeding issue. And last, you can have someone pour BBs into you ammo box while you are shooting. Its only drawback is when you first put BBs into the ammo box. It takes about 5 to 7 seconds of shooting for the first BB to travel up the spring tube and into the chamber. If there was one change I could make, I would have the spring tube run up inside the ammo box and out just below the top and through the support frame for a cleaner look. That said, Trigger Happy deserves a round of applause for this ammo box design.
After doing some research, I discovered that VFC actually makes the ammo box for Trigger Happy but Trigger Happy makes the support frame that attaches the ammo box to the gun. (So it is identical to the M60 Mk-43 ammo box. However the ammo box for the Mk-43 does not have the support frame and the BB spring tube that connects to the gun is different.)FIELD PERFORMANCENow for the field performance review. I’ve used this TH M240 in various terrain and weather from heavy winter snow fall in the Sierra Mountains to the heat of the of the Nevada desert. I've also humped it miles by hand and mounted on vehicles. The TH M240 performed admirably in all conditions.
P.11
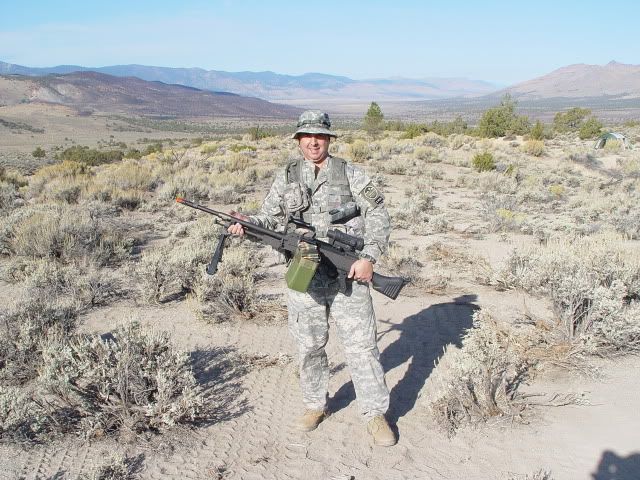
Reno Desert
P.12
Ambush In The SnowAt 16 pounds this gun is about 10lb lighter than the real one but still about twice as heavy compared to your average airsoft gun. Combine with its size of 49 inches which is just over 4 feet. This is a beast of a gun to be lugging around. When firing, the best position to be in is on the ground using your bipod. Shoulder firing is difficult for any long period of time and the ammo pouch hanging off to the left makes the gun unbalanced. On occasions I found myself borrowing a friend’s shoulder while he holds on to the bipod. This works pretty well. In most cases though, I found myself shooting from the hip. So getting a SAW sling is highly recommended.
When you do uses a sling, one thing I recommend is that you don’t attach it to your barrel. This can potentially put stress on the barrel and cause damage over a period of time. The best place to attach it is at the front end of the gas tube. The gas tube is the cylinder underneath the barrel and is attached to the receiver. At the end of the gas tube and just behind where the bipod attaches, you will see a “U” shape bracket on top that supports the barrel. Below it is a hole. On a real one I think an eye pin goes in this hole so you can attach your sling to it. Since there was none I had to improvise. An old Vietnam Vet told me that they use to use parachute cords to make slings for their M60. So I did just that. I took some parachute cord and ran it through the hole and made a big loop about 2.5~3 inches long on the left side (right side if you are left handed). Then I attach the front of the sling to the loop. Make sure that you have enough excess rope to wrap around the gas tube at least once. I also made a knot on both sides of the whole for added protection. The last thing you want to happen is have that parachute cord come off and have your barrel smack on the ground, potentially breaking it.
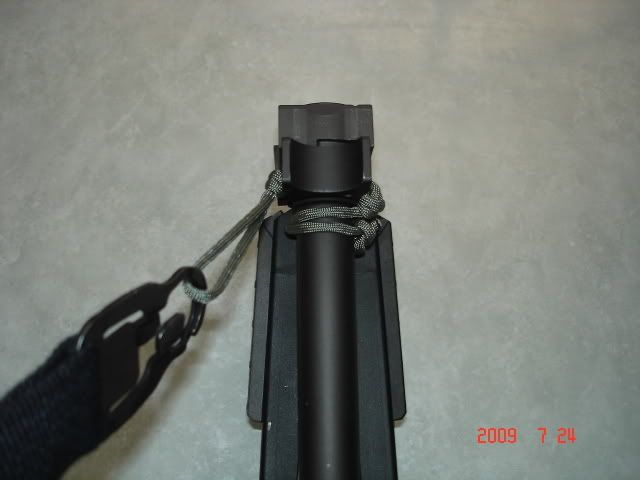
P.13 On a real M240 the cord wrapped around the gas tube would probably burn. But hey, this is airsoft.
Also, keep in mind that if you make the loop too short, the clip ring on the sling will rub against your barrel and scratch off that nice gun metal finish, showing the bright aluminum silver underneath. I learned this the hard way. By the way, the sling I use is a “Vickers Saw Sling” by Blue Force Gear. Also, an Army Sgt. who used the M240 in Iraq, recommended that I used a 2 point sling and not a 3 point tactical sling because 3 point sling occasionally gets tangle in the ammo pouch.
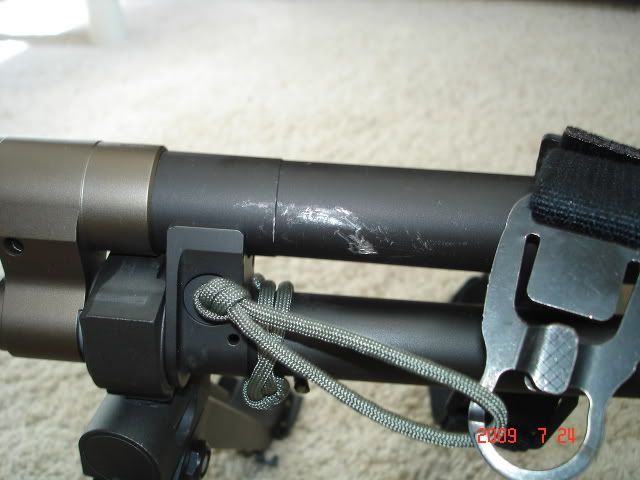
P.14 The finish was scratched off because I originally made the loop too short which allowed the clip end of the sling to rub against the barrel. A longer loop let the sling clip clear the barrel.
P.15
Anyway, back to the gun’s weight and size. Because of its weight and size, it’s a bit unwieldy. You will often find your self being the slowest guy in the pack and usually your buddies will be bitching at you for not moving fast enough. However, when shit hits the fan, everyone will be calling your name and when you start ripping a way, they will be cheering you on.
Another drawback is that you are slower to acquire your target and take cover. So if you come upon an enemy and both of you are surprised, usually the guy with the assault rifle is going to get the drop on you. So playing point man with this gun is usually not a good idea. Your best location is in the middle.
Keep in mind though, with a gun like this, your job on offense is suppression. Even with excellent range, accuracy and even a scope, you won’t be a sniper. It’s just too big and bulky. You want to use it to keep the other guy’s head down so your guys can move in for the kill. As I mentioned earlier, I like my SAWs to have a slow rate of fire. This allows me to hold the trigger down for a long period of time. Even though I may not be actually hitting a lot of targets, a long sustained burst can cause several psychological effects. The first one is paralysis. Guys will hunker down and stay there because they don’t want to get shot. Leaving your guys free to flank and take him out. Other guys will start freaking out and just want to get out of the hot zone. Even though they might be in a safe position, they may leave it just to get out. If your team mates are in good position he will be easy pickins, like flushing pheasant out of a bush. The last one is frustration. After being pinned for a while some guys may get frustrated. When they do, they are more likely to make mistakes and get shot.
Where this gun excels the most is in the defensive position. In the right spot you can lay waste to anything in your firing arc and hold people off for a long time. However, even in the best spot it’s always nice to have someone about 30~50 feet behind you to watch your back. You can bet that once you start controlling an area they will try to flank you. If you don’t, bug out just before you feel they’ve had enough time to flank you.
GROUND OPERATION ADVICEThis gun requires some special attention when operating. Here are some recommendation to protect your gun and improve your performance.
1. Since replacement ammo boxes are currently unavailable. Protect your ammo box as much as possible. If you wreck it. You'll be stuck with an expensive gun that you can't use.
2. Make sure you Lock-Tite the screws on the ammo box. (See more on this below)
3. When walking long distances. Do not fill your ammo box all the way to the top. I usually fill mine with about 2,000 rounds which is just less than half way. The reason for this is because the ammo box tends to bounce up and down a little as you walk. If you fill it up all the way. The added weight of a full ammo box puts extra stress on the support frame. Over a period of time it could potentially damage the support frame. I find that 2,000 rounds is more than enough for most situations. However, if you're in a fixed defensive position. Then filler her up!
4. Avoid running too hard or jumping with the M240. Doing this causes the ammo box to bounce up and down a lot and creates added stress to the ammo box support frame. This could cause potential damage to the frame. If you have to run and jump. Try to support the ammo box.
5. After a game is over. Remove the ammo box and put it in a SAW pouch.
6. As mentioned above, get a nice padded two point sling. This will greatly reduce your fatigue.
VEHICLE OPERATIONAnother area where this gun excels is being mounted on a vehicle. It’s probably the best airsoft gun for this use. In fact the real M240s original function was to be a vehicle mounted gun. However, when the Iraq war started, guys in the field were finding out that the M249 just didn’t have the knock down or penetration fire that they need. So they began requesting to replace the M249 with the M240. If you do mount it on a vehicle, it best to use real mounts. The cheapest way is to buy an M240 pintle mount and a travel lock. This can be bought for around $300~$350 but since the M240 pintle cradle is in current use, they are a bit difficult to find. However, I wanted to find a mount that had the pintle cradle and travel lock in one and was more compact. I searched the internet for them but most of them cost more than the gun itself. Plus nearly all of them had ammo trays which prevented me from using the ammo pouch. So I had a custom one made for $450. It turned out very nice and is strong enough to handle a real M240.
P.16
M240 pintle and travel lock
P.17
My custom M240 Cradle
P.18
M240 on my HMMWV rear turret gun mount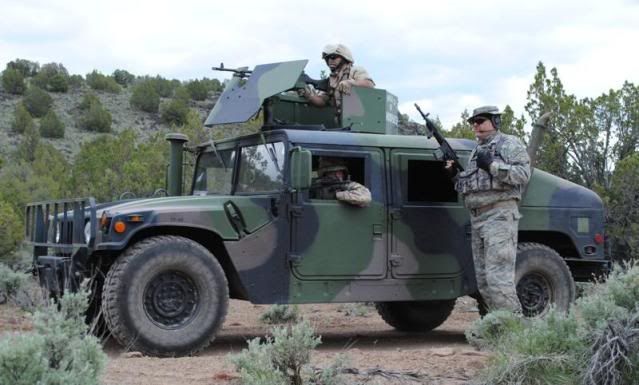
P.19
HMMWV on combat patrol with M240 mounted in the turret.Note: After a couple of vehicle operation I discovered that having an ammo tray to support the ammo box is a must. The ammo box just bounces around too much, especially off road, and will most likely break without some type of support. I have since upgraded my cradle to include an ammo tray.
P.20
Mount with added ammo tray to support ammo box.AFTER OP MAINTENANCE ADVICE1. During an OP. Dirt and debris tend to slip in through the top of the ammo box. It's recommended that you remove BBs from ammo box and rinse the BBs. Also, hold the box upside down and shake out any debris. If you have it, use an air bottle to blow out any remaining dirt and debris.
2. Remove the barrel and wipe of any dirt and especially moisture off the end of the barrel the goes inside the receiver. Coat it with a light wiping of silicon oil. (See more details below what moisture can do.)THE CONSWell now that I’ve talked about most of the good point about the gun. Here is what I was annoyed with.
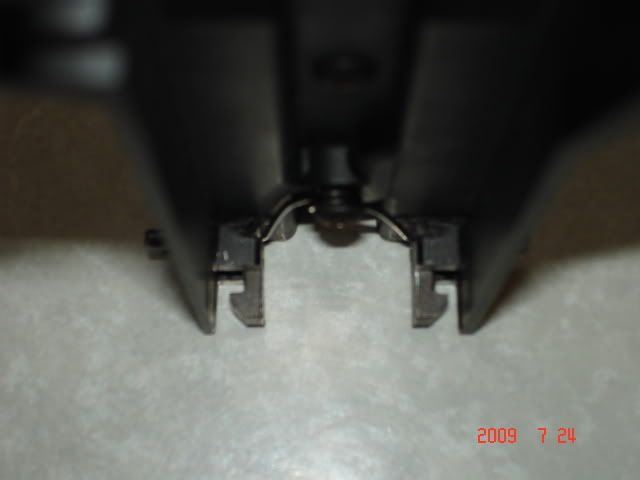
The first time I played with the gun. I put it on my friends shoulder to get better stability. When he went to grab the bipod, it fell off. Needless to say I was not happy. In the round cylinder section of the bipod, there is a pin that holds the bipod on. When you move the bipod forward, it opens the hole where the pin is. If the pin inside is not in tight, it just falls out and the bipod comes off as what happened in my case.
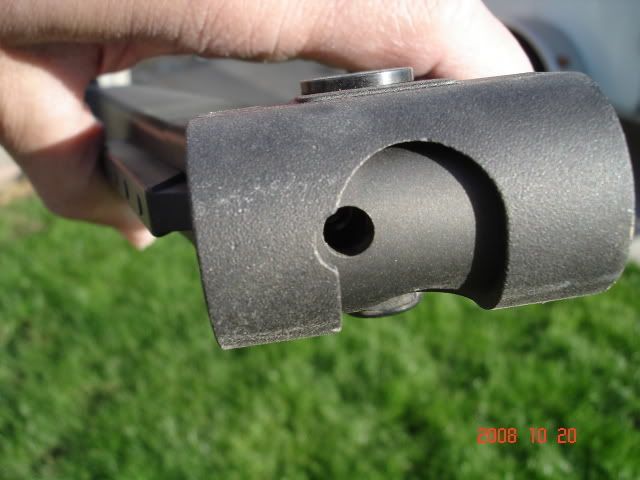
P.21
If Trigger Happy used a simple spring/tension pin, it would prevent the bipod from falling off.
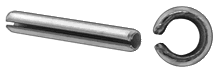
P.22
There is also a ball bearing and spring inside the cylinder to but this was lost as well when the bipod fell off. Fortunately I was able to get replacement parts for it at Orchard hardware store and fix it. If you own a TH M240, I strongly recommend that you glue the pin in with some Lock-Tight or replace it with a spring/tension pin.
If you do loose it, you can replace it with a 3/16" x 3/4" Spring/Tension Pin. You will need to cut it to the appropriate length. I pried mine open a little wider with a screw driver to add a little extra tension. Then tap it in with a punch. For extra measures you can dab a little super glue on the inside. (Good idea Steeljaw 36)
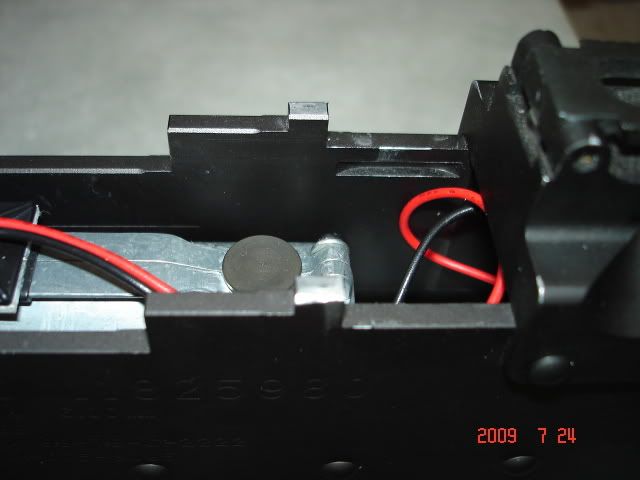
The second time I used my gun my ammo feeder broke. On the ammo pouch, there is a black triangle frame that connects the ammo pouch to the gun. The base of this triangle frame is connected to a large rectangle black plate. The 2 heavy duty nylon straps on the ammo pouch wrap around the large plate securing the ammo pouch to the frame. Holding this large rectangle plate to the triangle frame are two small screws. During play, these screws came loose and fell out and my ammo feeder pouch fell off. I lost one of the screws but found the other.

P.23
Fortunately it was an easy fix and once again I was able to find replacement screws at Orchard Hardware. Had I lost both screws, I would have had a real hard time figuring out what size screws when into those small holes. I was rather pissed that something so small and trivial could have turned my gun into an expensive paper weight. So I strongly recommend using Lock-Tight on these two little screws. Before you do this though, it might be a good idea to see if you can find spare screws, just in case.
By the way, the screw size is a metric M4x6mm .7 pitch (Fine).The third problem I ran into was after playing in the snow all day. My gun became damp and wet. I just stuck it in my bag and went home. The next day I pulled my gun out and removed my barrel to clean it. When I did, the section of the barrel that locks into the receiver had rust on it!
P.24
I was shock that something that is an important part of the gun would rust so easily and so quickly. Fortunately I had some silicon oil and cleaned it off. So if your gun ever does get wet, I recommend that at the end of the day you take your gun apart and thoroughly dry it off. It might also be a good idea to rub a light coat of silicon or gun oil on the metal locking rings on the barrel just below the carry handle and also the hole where you insert the barrel into the receiver to prevent rusting.
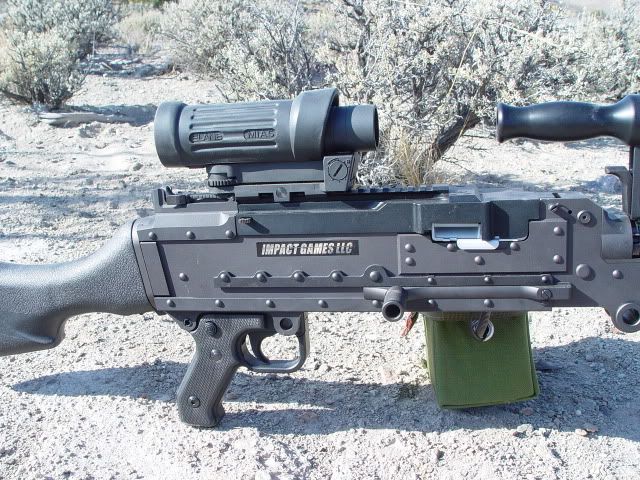
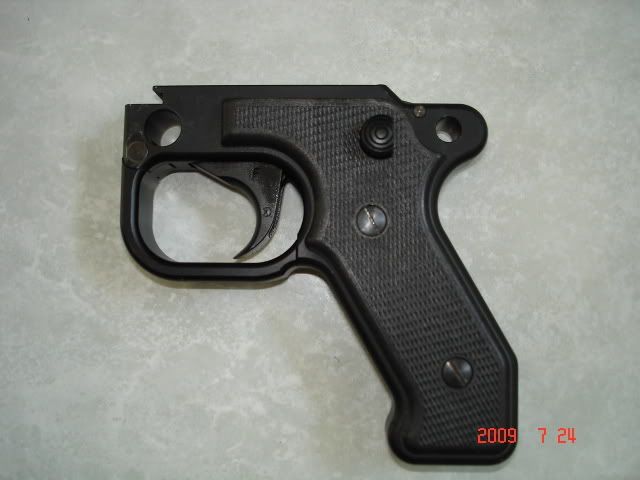
The fourth problem I ran into was the trigger guard. In the upper front section of the trigger guard there is a small pin just below a large hole. If you remove this pin, the trigger guard comes off. However, this pin is loose and can easily fall out and cause the trigger guard to fall off. If you loose it, it will be very difficult to replace. I secured it by putting some scotch tape over it. For the most part though, you should never have a need to remove this pin. By the way, as long as the trigger is in the gun, this pin will not fall out. The earlobe holes use for the travel lock that come down over the front trigger, covers part of the pin and prevents it from falling out. (You can see this by looking at the 2nd picture from the top.) It's only when you remove the trigger that the pin can fall out.
P.25
The fifth problem I had again was related to the ammo box. Last month (Oct 09) I humped my M240 a good 3 or 4 mile up and down hill in variation of up to 500 ft in elevation. When I returned home, I discovered once again that some screw came out and almost caused me to lose a part that could have potentially prevent my ammo box from working. At the end of the BB feeding tube that sits next to the gear box when it is clipped in, there is a piece on top that that his held by two screws. This piece helps guide the BBs into the gear box. One of the screws had come loose and the other one fell out completely. At first I thought I had lost it on the field but fortunately found it lying on my garage floor. This screw is very small and I could have easily missed it but I was lucky that I found it.(By the way, the size for these two screws are a metric M2 x 8mm fine thread, should you ever need to replace them).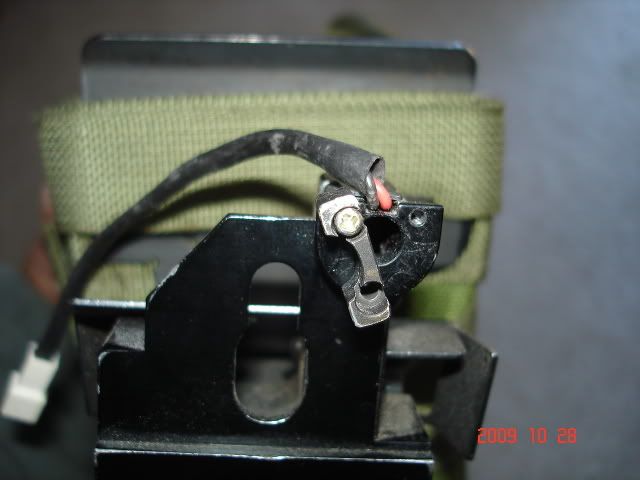
P.26
Had I lost this piece, it would be very difficult to make a substitute piece. I could probably make something but it's reliability would be uncertain and worst case my gun would no longer be usable.
This most likely occurred because of the long march I had with the gun. Every time you take a step the ammo box bounces a little. At one point I also had it slung over my back and did not remove the ammo box which probably added additional stress to the ammo box. Bouncing around for a long period of time most likely caused the screws to slowly back out.
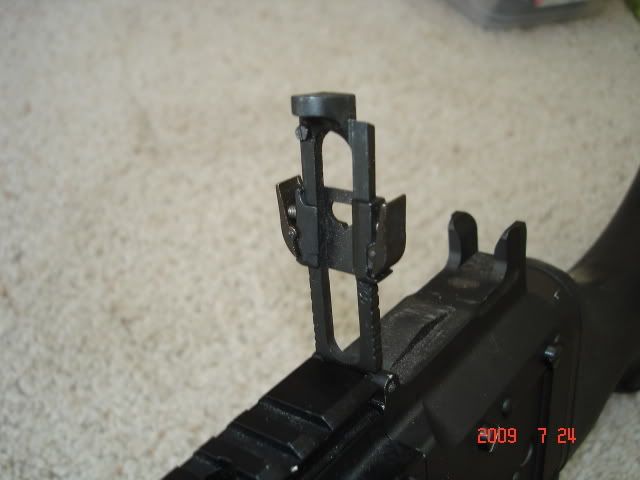
Because of this latest incident I experienced with this ammo box. I STRONGLY recommend that you use Lock-Tight or some other glue on all the screws that are use on the ammo box. It will save you a lot of worries and heart aches should it become inoperable because you lost some stupid screws.Last was the rear sight. The sight was slightly bent so the range finder would not slide all the way up or down. This is rather a minor annoyance but for the price you pay for this gun you expect it to be perfect.
P.27
Overall, I think Trigger Happy hit all the big stuff on the mark and with a proper upgrade, the gun is a top notch solid performer. However, they miss the mark when it came to paying attention to the small details. A loss of a few small screws in the right place can put you out of commission. Perhaps the biggest draw back is the lack of replacement parts should you break or loose something. The most critical issue is the ammo box. This is perhaps the most vulnerable piece of the gun. If you should ever fall and brake it or it craps out on you or falls apart because you lost some stupid tiny screws. You’re screwed and stuck with an expensive wall decoration because there are no replacements available. At minimum, Trigger happy should at least make extra ammo feeder pouches available for purchase.
Note: As mentioned above, VFC makes the ammo box for the TH M240. Should your magazine box ever brake, you should be able to replace most parts with the VFC one. VFC sells theirs for $120. You can contact them through their web site. http://www.gb-tech.com.tw/Recently I discovered that Echo-1 is planning to come out with their own version of the M240. From the pictures I have seen it looks like the ammo box they will use apparently is the same one that Trigger Happy uses. If this turns out to be true. I will be extremely relieved if they sell spare ammo boxes. But for now, I'll just keep my fingers crossed.
If anyone has any more questions, let me know and I will update this review.
TH M240 video manual. (This is the instruction manual that comes with the gun when your purchase it).
http://www.youtube.com/watch?v=pvhOMoTuhw0Here are some other reviews and links about the Trigger Happy M240.
http://www.airsoftpacific.com/content.php?page=53http://www.airsoftpacific.com/cms_view_article.php?aid=21
VFC MK43 Mod0 Tune-Up Video.
This gun has a similar gear box and the same ammo box as the TH M240 but with a different BB feed connection. It gives a brake down on both.
http://video.google.com/videoplay?docid=-6981761473105456457#
Inokatsu MAG 58/M240Some people have asked how the Inokastu M240 compares to Trigger Happy's. The best info I found on the Inokatsu gun was a review done by Redwolf.
http://www.redwolfairsoft.com/redwolf/airsoft/ReviewDetail?reviewID=194If anyone ever has a used one they would like to sell. Please contact me.

